Power BI is a business intelligence tool from Microsoft that helps organizations collect, manage, and analyze data from various sources.
It is a collective name of several cloud-based apps and services that gather and process the data to pull understandable data insights in interactive data charts and graphs. This enables business owners to understand their business to make an informed decision clearly. 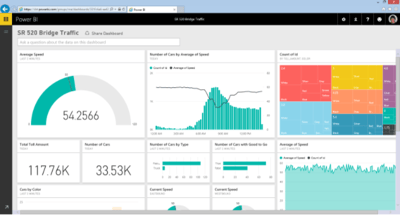
Microsoft Power BI assembles data from a wide range of sources, from basic excel to vast cloud databases.
Power BI is a collective term for Windows desktop application Power BI Desktop, online software as a service called Power BI services, and Power BI app available on Android, iOS, and Windows devices.
Display Power BI Dashboards on TV Screen
There can be various reasons to display Power BI reports in offices. Organization strategically displays the Power BI reports in their office near the service desk, prominently visible to every person, to ensure they have access to critical data regarding the company's performance and its standing against competitors. Moreover, displaying these reports within the office environment serves as a constant source of information for employees and teams, keeping them updated on crucial situations and enabling them to make informed decisions.

There are many other reasons to use Power BI report in office and other areas. The data is also displayed in shops and digital signage screens to display valuable insights.
Web Browser through the Smart TV
Displaying a Power BI report can be pretty straightforward. Simply connect a computer with your TV or digital signage screen, open the web browser, search Power BI, and adjust it into full-screen mode.
But this is expensive and consumes a lot of resources. A computer can perform many different tasks other than displaying a Power BI report. Moreover, it cannot display multiple Power BI dashboards and reports.
RocketScreens Digital Signage Software
The most effective method for showcasing Microsoft Power BI reports is by utilizing digital signage software. This software serves as the essential tool for users to efficiently oversee digital signage displays and securely broadcast Power BI content from a distance. Additionally, it enables users to create and arrange signage content on a predetermined schedule.
RocketScreens is a functional digital signage software with a strong focus on meeting office needs. This versatile solution seamlessly presents a wide range of content formats, including PPTs, PDFs, KPIs, graphs, dashboards, and reports. Additionally, its user-friendly interface enables effortless content sharing, enhancing collaboration and communication within the workplace.
It can integrate 100 of the most popular apps, including Twitter, YouTube, Facebook, Google, Tableau, Salesforce, and Microsoft Power BI. RocketScreens also has Canva to create content and graphics in RocketScreens directly.
The scalable and flexible platform can run on four different players; virtual, physical, web, and webTV player. This flexibility allows the user to share content in thousands of places through a single account.
The software is straightforward; users can design content by simple drag and drop. It also lets you set the favorite items, add tags, clone, lock, preview, and edit content. Pricing is very affordable, and it also offers a free demo.
How to set up Power BI in RocketScreens?
Setup is effortless; follow these steps to set Microsoft Power BI on your digital TV screen. In short, you will add a device first in which you want to play the power bi reports like a TV screen. Then you will create a channel; this is where we can add dashboards and reports. The last thing is to embed the Power BI with RocketScreens digital signage. Once you create your free account, follow the steps below on how to get your KPI's, dashboards, and reports on your scenes.
1. Adding a Player
Registering a Player is straightforward.
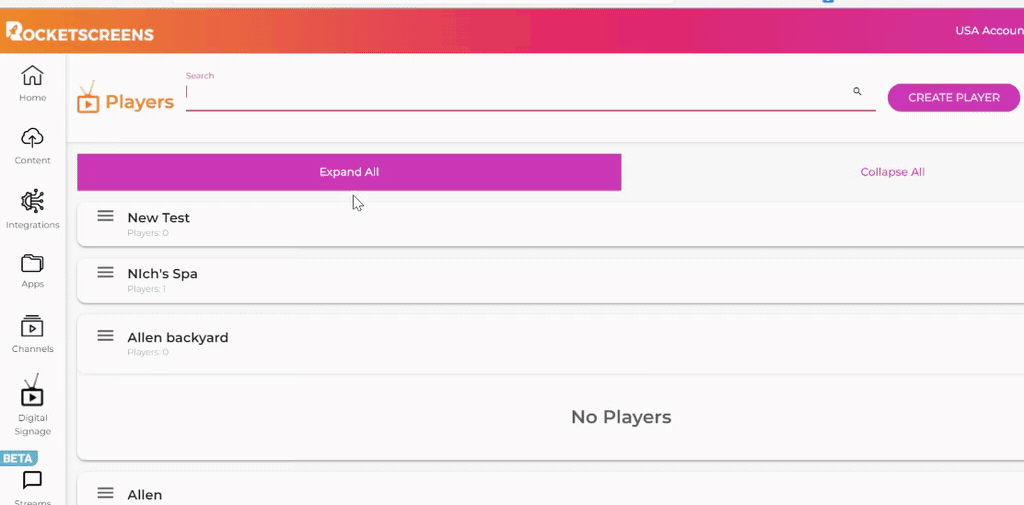
Click on the “Create Player” button on the top right corner of the Digital Signage Menu screen.
When registering a new player, make sure that you have enough licenses; if they are not sufficient, a pop-up will remind you of that.
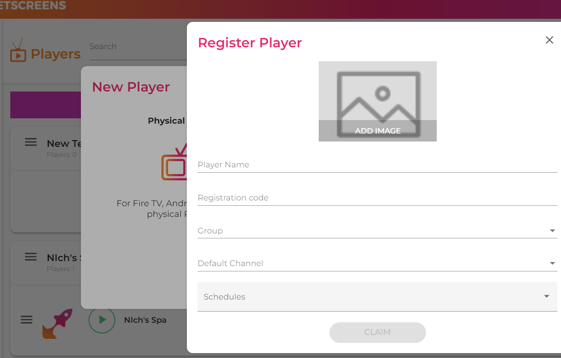
If you have the license, then this Window will appear. Here you will give a device name and registration code, specify the group you want to keep it in, or create a new one. Lastly, you will select the channel you want to play. Click claim, and you will have a new device. Click on the device name on the home screen to edit the device, like adding channels, scheduling the content, and much more.
2. Creating a Channel
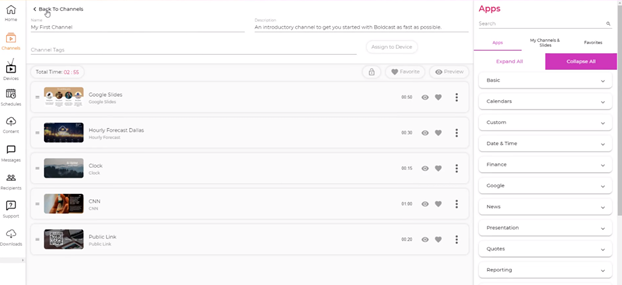
The next thing is creating a channel. Open the channel screen from the dashboard and click the CREATE CHANNEL button to make one.
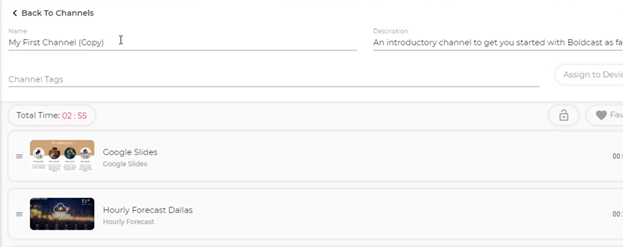
Click on the channel to open it; you will find useful tools to edit it. Upon opening, you will see the name, description, and tags options on top.
Then you have the total time, lock, favorite, and preview options. After these options, there are slides that you can edit in a number of different ways by clicking on them.
You can shuffle the slides by dragging and dropping.
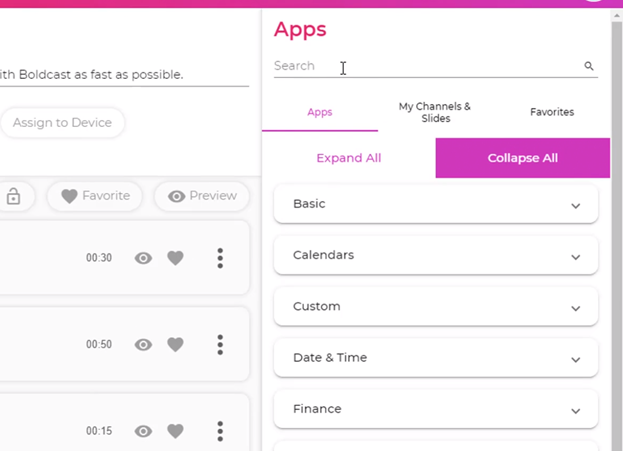
There are Apps, My Channel & Slides, and Favorites columns on the right. As for now, it has over 100 supported apps; you can search them in the search bar. Simply drag and drop an app to the slides to add it to your channel. Then select the relevant properties to integrate the app with the other slides.
3, Adding the Power BI app to the RocketScreens
After adding the device and creating the channel, it’s time to integrate the power bi with the RocketScreens. Follow these simple steps and add reports to your channel.

4. On the left toolbar, you will see the integration tab Open it
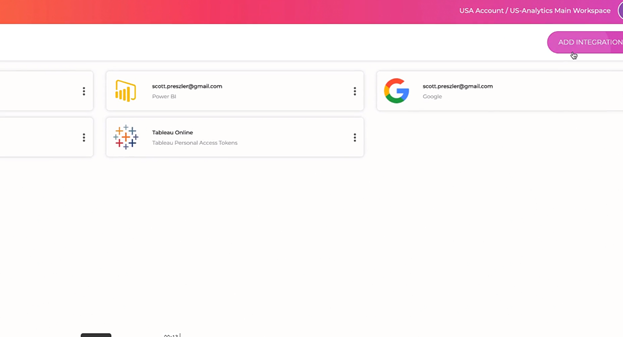
On the top right corner, there is the “Add Integration” button. Click it and find the Power BI integration.
Clicking the power bi integration will open a window; you will authenticate Power BI and authorize RocketScreens to connect to it. It will tell you when it’s done.
5. After authentication and authorization, go to the channel tab on the dashboard to create a Power BI slide.
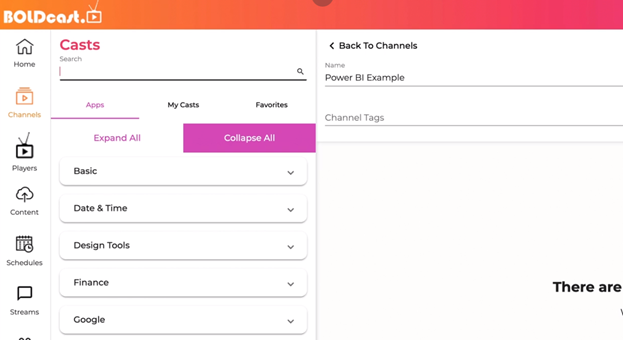
6. Search and select the Power BI connector.
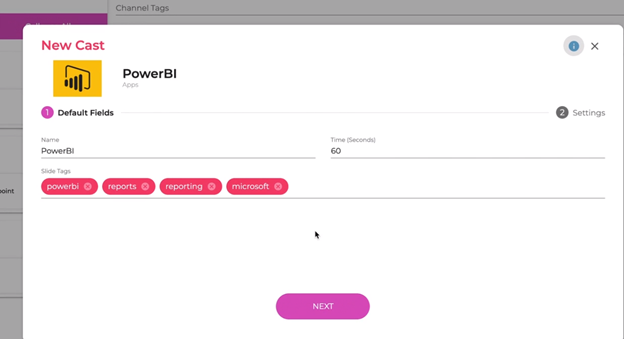
7.In the pop-up, set the name, duration, and tags, then click next.
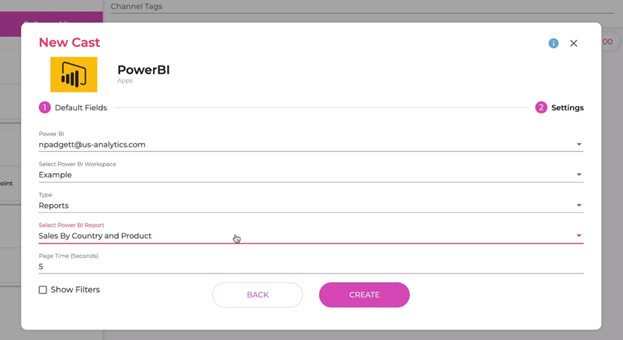
On the next page, you will see some metrics; for the first one, select the integration you just created, then select the workspace you want to pull the information from. Select the type from the dropdown; suppose you have chosen the report; another option will appear in which you will select the report that you want to display. Lastly, specify the page time and click CREATE.
Congratulations, your report is ready for your TV screen or digital signage screens.